


“Reverse engineering is the process of extracting the knowledge or design blueprints from anything man-made. Software is one of the most complex and intriguing technologies around us nowadays, and software reverse engineering is about opening up a program’s 'box' and looking inside. Of course, we won’t need any screwdrivers on this journey. Just like software engineering, software reverse engineering is a purely virtual process, involving only a CPU, and the human mind” Reversing – Secrets of Reverse Engineering – Eldad Eilam
Before we get involved with reversing itself it's important to learn how the binary software assembling really works.
For its construction, it is necessary (unless you are masochistic and want to build machine code directly) a programming language. This translates as a standardized method to inform instruction to a processor. Each language has its own standardization as well as their level of abstraction (low, medium and high).
Following, are highlighted the procedures demanded for the transformation of the written code in a block of statements "understandable" by the computer.
Software assembling
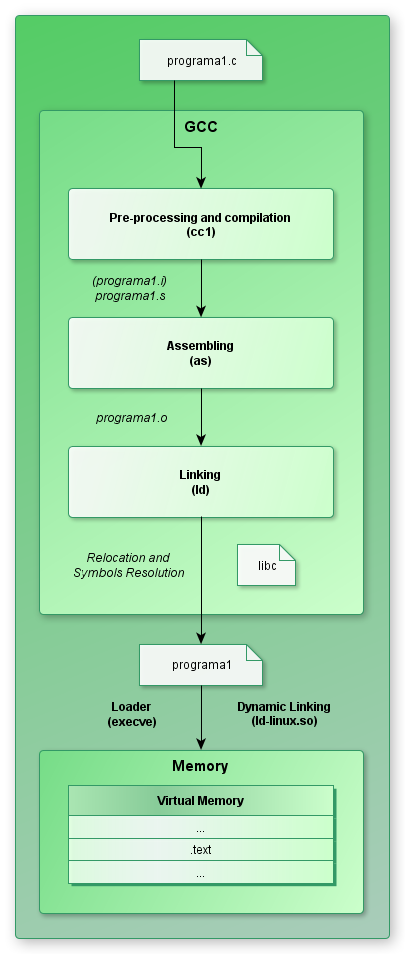
The construction or compilation is a multistage process that involves various tools. In our case, the tools used will be the front-end of gcc (GNU Compiler), the cc1 (C Compiler), the as (GNU Assembler), the collect2 (ld wrapper), and ld (GNU Linker). The complete set of tools used in the process of compilation is called toolchain, which is already installed on GNU / Linux most of time. The creation of specific toolchains are essential for cross-compiling but this subject is for a future post.
While invoking GCC the sequence of commands executed obey the following stages:
- compilation (source code to assembly language)
- assembler (assembly language into machine code)
- linking (creating the final binary)
# mkdir construindo; cd construindo
# echo -e "#include <stdio.h>\nint main() { printf(\"Hello World\\\n\"); return 0;}" > programa1.c
To this compilation we will use gcc.
# gcc programa1.c -o programa1
While running gcc the preprocessing, compilation, assembly and linking steps are performed one after another in a transparent manner until the ELF binary 'programa1' is finally created.
# ./programa1
Hello World
Then, for better understanding, we will cover each phase manually.
Preprocessing and Compilation
PreprocessingIn past versions of gcc, preprocessing was done as a separate stage through cpp (C preprocessor):
# cpp programa1.c -o programa1.i
The output was a file with expanded macros and declared header files included. The preprocessor, in fact, translate the average abstraction of C language (that we programmed) to another one to be recognizable by the next stage of the build.
# 1 "programa1.c"
# 1 "<command-line>"
# 1 "programa1.c"
# 1 "/usr/include/stdio.h" 1 3 4
# 28 "/usr/include/stdio.h" 3 4
# 1 "/usr/include/features.h" 1 3 4
...
...
extern void funlockfile (FILE *__stream) __attribute__ ((__nothrow__ , __leaf__$
# 940 "/usr/include/stdio.h" 3 4
# 2 "programa1.c" 2
int main(void) { printf("Hello World\n"); return 0;}
This first stage is currently embedded by cc1 compiler when used with default options, ie, it is usually omitted.
# gcc programa1.c -o programa1 -v
...
/usr/lib/gcc/x86_64-linux-gnu/4.7/cc1
-quiet -v -imultiarch x86_64-linux-gnu programa1.c -quiet -dumpbase
programa1.c -mtune=generic -march=x86-64 -auxbase programa1 -version
-fstack-protector -o /tmp/ccZvPRPS.s
...
As can be seen in verbose mode the cc1 performs preprocessing and compilation generating the assembly file directly. We can make the cc1 be invoked twice, with the use of -no-integrated-cpp option primarily for preprocessing, generating the expanded file (*. I) and then to compile, generating mounting file (*. s). This proceeding is useful when you want to use a preprocessor alternative.
# gcc programa1.c -o programa1 -v -no-integrated-cpp
...
/usr/lib/gcc/x86_64-linux-gnu/4.7/cc1 -E -quiet -v -imultiarch x86_64-linux-gnu programa1.c -mtune=generic -march=x86-64 -fstack-protector -o /tmp/ccjNwBsL.i
...
/usr/lib/gcc/x86_64-linux-gnu/4.7/cc1
-fpreprocessed /tmp/ccjNwBsL.i -quiet -dumpbase programa1.c
-mtune=generic -march=x86-64 -auxbase programa1 -version
-fstack-protector -o /tmp/cc0B4fmf.s
...
...
We may also interrupt the process of gcc, invoking cc1 only once with the intention of you generate the file (*. I) preprocessed.
# gcc programa1.c -o programa1.i -v -E
...
/usr/lib/gcc/x86_64-linux-gnu/4.7/cc1 -E -quiet -v -imultiarch x86_64-linux-gnu programa1.c -o programa1.i -mtune=generic -march=x86-64 -fstack-protector
...
To do this we use the option '-E'.
Compilation
The main purpose of using cc1 through the expanded file or not (programa1.i) is generate its respective assembly code, low-level language.
# gcc programa1.i -o programa1.s -v -S
...
/usr/lib/gcc/x86_64-linux-gnu/4.7/cc1 -fpreprocessed programa1.i -quiet -dumpbase programa1.i -mtune=generic -march=x86-64 -auxbase-strip programa1.s -version -o programa1.s -fstack-protector
...
...
/usr/lib/gcc/x86_64-linux-gnu/4.7/cc1 -quiet -v -imultiarch x86_64-linux-gnu programa1.c -quiet -dumpbase programa1.c -mtune=generic -march=x86-64 -auxbase-strip programa1.s -version -o programa1.s -fstack-protector
...
The option '-S' instructs gcc to only convert the C code, preprocessed or not, to assembly language (programa1.s).
.file "programa1.c"
.section .rodata
.LC0:
.string "Hello World"
.text
.globl main
.type main, @function
main:
.LFB0:
.cfi_startproc
pushq %rbp
.cfi_def_cfa_offset 16
.cfi_offset 6, -16
movq %rsp, %rbp
.cfi_def_cfa_register 6
movl $.LC0, %edi
call puts
movl $0, %eax
popq %rbp
.cfi_def_cfa 7, 8
ret
.cfi_endproc
.LFE0:
.size main, .-main
.ident "GCC: (Ubuntu/Linaro 4.7.2-2ubuntu1) 4.7.2"
.section .note.GNU-stack,"",@progbits
Attention! The assembly code generated may be different on your computer. This discrepancy may have been caused by several reasons: gcc version; architecture used; compilation flags.
To generate the corresponding code in 32-bit, just use the-m32.
# gcc programa1.i -S -m32
or
# gcc programa1.c -S -m32
See the difference:
.LFB0:
.cfi_startproc
pushl %ebp
.cfi_def_cfa_offset 8
.cfi_offset 5, -8
movl %esp, %ebp
.cfi_def_cfa_register 5
andl $-16, %esp
subl $16, %esp
movl $.LC0, (%esp)call puts
movl $0, %eax
leave
.cfi_restore 5
cfi_def_cfa 4, 4ret
.cfi_endproc
Assembler
In assembly the code is converted into their related instructions into machine code. The result is an object file (object file).
# gcc programa1.s -o programa1.o -v -c
...
as -v --64 -o programa1.o programa1.s
...
...
# gcc -c programa1.s -o programa1.o -v -m32 -c
...
as -v --32 -o programa1.o programa1.s
...
...
The '-c' option tell the gcc to compile only or just mount the source file, skipping the linking process.
As seen above, the "as" assembles the binary using the assembly file(programa1.s). When we run the file against the constructed object-file we can see the ELF structure.
As seen above, the "as" assembles the binary using the assembly file(programa1.s). When we run the file against the constructed object-file we can see the ELF structure.
# file programa1.o
programa1.o: ELF 32-bit LSB relocatable, Intel 80386, version 1 (SYSV), not stripped
programa1.o: ELF 64-bit LSB relocatable, x86-64, version 1 (SYSV), not stripped
However as the build process has not been finished, when we try to run it we get the message that it is impossible to run the binary file. By using ltrace (analysis tool called the libraries) we get the message "./programa1.o is not an ELF executable nor shared library". The assembler built a block of binary instructions for the architecture but not defined the addresses related to the external functions and consequently not relocated the binary to the correct execution.
Linking
Until then the object file assembled do not know where to look (the address of the functions necessary for the correct functioning). The Linking is, in this case, the process of agglutination of the object files, symbol resolution and relocation of the sections and their addresses in binary once generated.
Let's see.
Let's see.
# gcc programa1.o -o programa1 -v
...
/usr/lib/gcc/x86_64-linux-gnu/4.7/collect2
--sysroot=/ --build-id --no-add-needed --as-needed --eh-frame-hdr -m
elf_x86_64 --hash-style=gnu -dynamic-linker /lib64/ld-linux-x86-64.so.2
-z relro -o programa1
/usr/lib/gcc/x86_64-linux-gnu/4.7/../../../x86_64-linux-gnu/crt1.o
/usr/lib/gcc/x86_64-linux-gnu/4.7/../../../x86_64-linux-gnu/crti.o
/usr/lib/gcc/x86_64-linux-gnu/4.7/crtbegin.o
-L/usr/lib/gcc/x86_64-linux-gnu/4.7
-L/usr/lib/gcc/x86_64-linux-gnu/4.7/../../../x86_64-linux-gnu
-L/usr/lib/gcc/x86_64-linux-gnu/4.7/../../../../lib
-L/lib/x86_64-linux-gnu -L/lib/../lib -L/usr/lib/x86_64-linux-gnu
-L/usr/lib/../lib -L/usr/lib/gcc/x86_64-linux-gnu/4.7/../../.. programa1.o
-lgcc --as-needed -lgcc_s --no-as-needed -lc -lgcc --as-needed -lgcc_s
--no-as-needed /usr/lib/gcc/x86_64-linux-gnu/4.7/crtend.o
/usr/lib/gcc/x86_64-linux-gnu/4.7/../../../x86_64-linux-gnu/crtn.o
...
or
# gcc programa1.o -o programa1 -v -m32
...
/usr/lib/gcc/x86_64-linux-gnu/4.7/collect2
--sysroot=/ --build-id --no-add-needed --as-needed --eh-frame-hdr -m
elf_i386 --hash-style=gnu -dynamic-linker /lib/ld-linux.so.2 -z relro -o
programa1 /usr/lib/gcc/x86_64-linux-gnu/4.7/../../../../lib32/crt1.o
/usr/lib/gcc/x86_64-linux-gnu/4.7/../../../../lib32/crti.o
/usr/lib/gcc/x86_64-linux-gnu/4.7/32/crtbegin.o
-L/usr/lib/gcc/x86_64-linux-gnu/4.7/32
-L/usr/lib/gcc/x86_64-linux-gnu/4.7/../../../i386-linux-gnu
-L/usr/lib/gcc/x86_64-linux-gnu/4.7/../../../../lib32
-L/lib/i386-linux-gnu -L/lib/../lib32 -L/usr/lib/i386-linux-gnu
-L/usr/lib/../lib32 -L/usr/lib/gcc/x86_64-linux-gnu/4.7
-L/usr/lib/gcc/x86_64-linux-gnu/4.7/../../../i386-linux-gnu
-L/usr/lib/gcc/x86_64-linux-gnu/4.7/../../.. -L/lib/i386-linux-gnu
-L/usr/lib/i386-linux-gnu programa1.o -lgcc --as-needed
-lgcc_s --no-as-needed -lc -lgcc --as-needed -lgcc_s --no-as-needed
/usr/lib/gcc/x86_64-linux-gnu/4.7/32/crtend.o
/usr/lib/gcc/x86_64-linux-gnu/4.7/../../../../lib32/crtn.o
...
What gcc actually does is invoke collect2 (wrapper for the ld (binutils)) stating all the object files to be linked.
It is true that ld can be used directly, of all sorts, the gcc/collect2 now informs all libs needed for linking, which makes it much easier.
After the process is finished, you can verify that the executable is properly linked.
It is true that ld can be used directly, of all sorts, the gcc/collect2 now informs all libs needed for linking, which makes it much easier.
After the process is finished, you can verify that the executable is properly linked.
# file programa1
programa1: ELF 32-bit LSB executable,
Intel 80386, version 1 (SYSV), dynamically linked (uses shared libs),
for GNU/Linux 2.6.24, BuildID[sha1]=0xa0c...bf73, not stripped
programa1: ELF 64-bit LSB executable,
x86-64, version 1 (SYSV), dynamically linked (uses shared libs), for
GNU/Linux 2.6.24, BuildID[sha1]=0xe07...8df3, not stripped
And finally run it.
# ./programa1
Hello World
Conclusion
We were able, in this post, to follow briefly the process of building an ELF executable, exemplifying their procedures in GNU / Linux using GCC. Next, we will begin a practical approach of reverse engineering that will enable an understanding of the ELF structure as well as the method and tools used in reversing.
See you there!
Translated by: Pedro Fausto
See you there!
Translated by: Pedro Fausto
More Information
Reversing – Secrets of Reverse Engineering – Eldad EilamReverse Engineering
A Introduction to GCC – Brian Gough
Compiler, Assembler, Linker and Loader: A Brief Story
Basics of GCC compilation process
GNU C Compiler Internals/GNU C Compiler Architecture
GCC front-end Whitepaper - Andi Hellmund
Programming language
List of programming languages by type
C (programming language)
Low-level programming language
Assembly Language
Machine code

Nenhum comentário:
Postar um comentário